Web Application Firewall (WAF) Integration
In modern web development, securing web applications is of utmost importance, especially with increasing threats such as SQL injections, cross-site scripting (XSS), and distributed denial-of-service (DDoS) attacks. A Web Application Firewall (WAF) plays a critical role in protecting web applications by filtering and monitoring HTTP traffic between a web application and the internet.
Introduction to Web Application Firewalls (WAF)
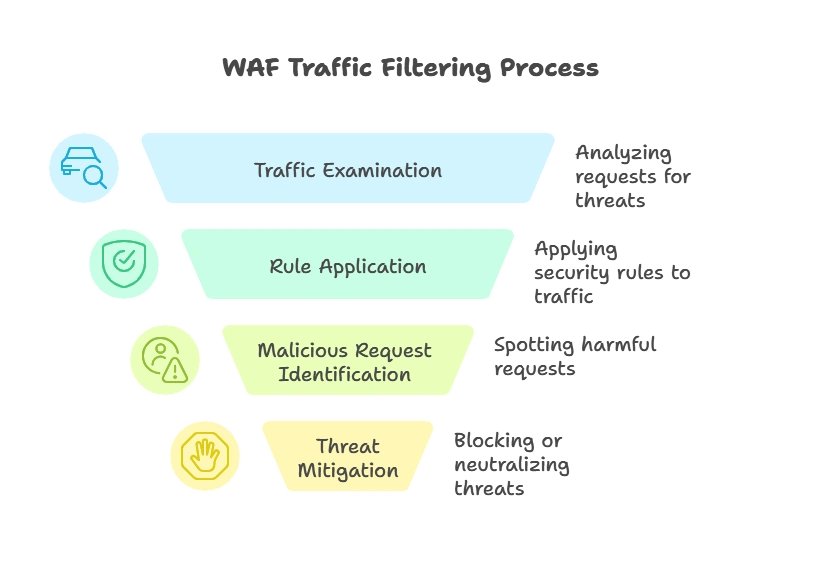
A Web Application Firewall (WAF) is designed to protect web applications from various threats, including SQL injections, XSS, and other security vulnerabilities. A WAF filters, monitors, and blocks malicious HTTP traffic directed at web applications. It operates by examining the incoming traffic and applying predefined security rules to identify and mitigate malicious requests.

How WAFs Work
WAFs analyze HTTP requests and responses based on security policies. These policies are generally configured to detect anomalies in request patterns, allowing WAFs to block or log suspicious traffic. For instance, a WAF may inspect a request for SQL injection patterns and block it if it detects malicious intent. WAFs often operate in the OSI Layer 7 (Application Layer), focusing on HTTP and HTTPS protocols.
Benefits of Using WAF with Node.js
- Enhanced Security: Protects against common vulnerabilities (e.g., SQL injection, XSS).
- DDoS Mitigation: Detects and blocks excessive traffic from potential DDoS attacks.
- Traffic Monitoring: Provides insights into traffic patterns and potential threats.
- Compliance: Helps meet regulatory standards by protecting sensitive data.
- Reduced Application Complexity: Allows the Node.js application to focus on functionality rather than security.
Types of Web Application Firewalls
Network-Based WAF
- Typically deployed as a hardware appliance.
- Fast response times due to proximity to the application.
- Ideal for organizations with extensive network security infrastructure.
Host-Based WAF
- Runs as software on the same server as the application.
- Allows for custom configuration and integration with application code.
- More resource-intensive, potentially affecting performance.
Cloud-Based WAF
- Offered as a service by providers like AWS, Azure, and Cloudflare.
- Simple to set up, manage, and scale.
- Ideal for distributed applications and multi-location deployment.
Setting Up a WAF for a Node.js Application
Prerequisites
- Node.js Application: Ensure your application is hosted on a server or cloud provider.
- WAF Provider: Choose a WAF provider based on requirements and budget.
- Administrator Access: Necessary for server-based or host-based WAF setup.
Choosing a WAF Provider
Some popular WAF providers include:
- AWS WAF
- Azure WAF
- Cloudflare WAF
- ModSecurity (for self-managed, host-based WAF)
WAF Integration in Node.js
Cloud-Based WAF Setup (Example with AWS WAF)
Cloud-based WAFs like AWS WAF are managed services, offering flexibility and reduced setup complexity. AWS WAF, for example, integrates with Amazon API Gateway and Amazon CloudFront, making it straightforward to configure and scale.
Host-Based WAF Setup (Example with ModSecurity)
ModSecurity is an open-source, host-based WAF that can be configured on the same server as a Node.js application. It provides powerful rule customization options but requires proper configuration and management.
Example: Configuring AWS WAF with Node.js
Step 1: Create an AWS WAF Web ACL
- Sign in to AWS Console: Go to the WAF & Shield service.
- Create a Web ACL: Define rules to filter traffic (e.g., SQL injection, XSS).
- Attach Web ACL to CloudFront: Select the distribution linked to your Node.js app.
Step 2: Define WAF Rules
AWS WAF allows you to create custom rules or use managed rule sets.
- Managed Rules: Pre-configured rules provided by AWS, covering common attack patterns.
- Custom Rules: Define IP address filters, rate-based rules, or specific patterns.
					{
  "WebACL": {
    "Name": "MyWebACL",
    "DefaultAction": {"Block": {}},
    "Rules": [
      {
        "Name": "RateLimitRule",
        "Action": {"Limit": 1000},
        "Condition": "RateLimitCondition"
      }
    ]
  }
}
Step 3: Testing the AWS WAF with Node.js
Once configured, AWS WAF will start filtering requests. You can simulate traffic patterns to verify the WAF’s effectiveness by sending requests that meet the conditions defined in your rules.
Output
Accessing the Node.js application’s URL via CloudFront will apply the WAF rules, and suspicious requests should be blocked or logged. You can check the AWS CloudWatch logs to see which requests were blocked.
Monitoring and Testing the WAF in Node.js
To verify that the WAF is protecting your application:
- Simulate Threats: Send sample requests with malicious payloads to test blocking capabilities.
- Review Logs: Check logs in AWS CloudWatch or your WAF dashboard to analyze blocked traffic.
- Adjust Rules: Fine-tune WAF rules based on application needs and testing results.
Best Practices for WAF Configuration in Node.js
- Use Managed Rulesets: Leverage pre-configured rulesets that cover common threats.
- Implement Rate Limiting: Mitigate DDoS attacks by setting rate limits for incoming requests.
- Regularly Update Rules: Update WAF rules as new threats emerge.
- Monitor Logs Regularly: Analyze logs to detect suspicious patterns and optimize rule configurations.
Integrating a Web Application Firewall with Node.js is a powerful way to protect web applications from a range of security threats. While cloud-based WAFs provide a managed and scalable solution, host-based options like ModSecurity offer flexibility for more customized protection. Happy Coding!❤️
